
2D to 3D Floor Plan — Exploded View
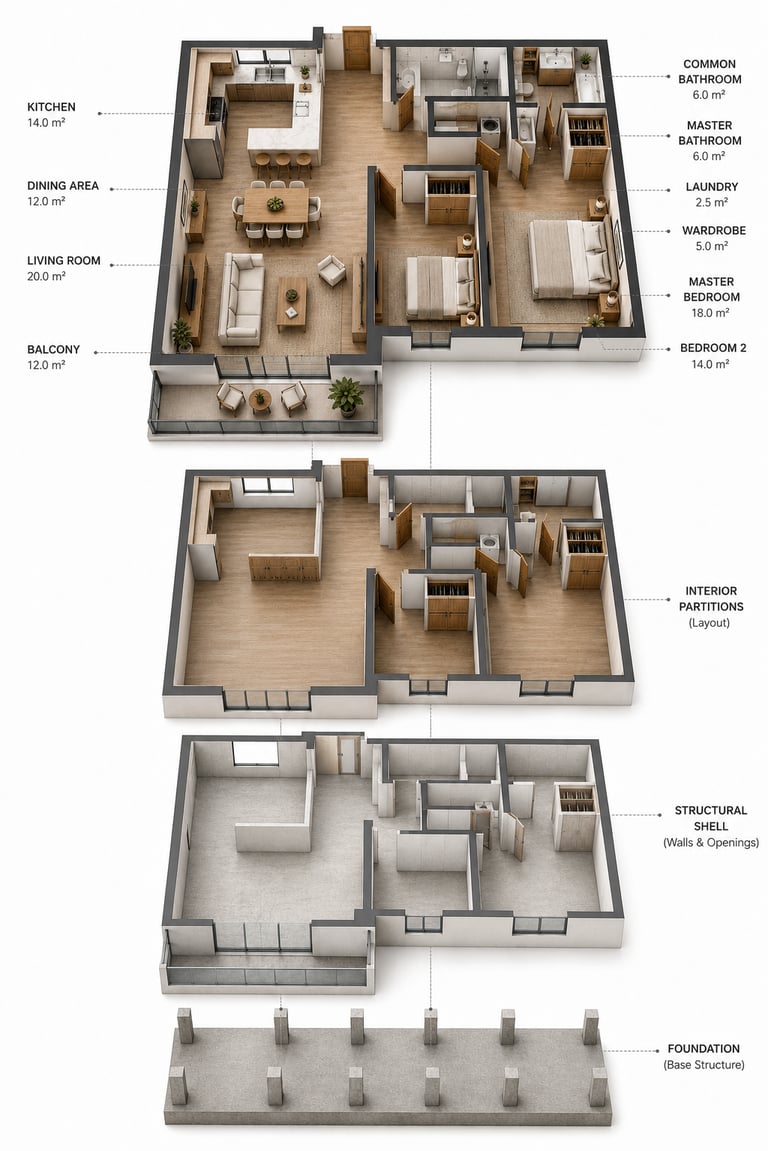
Convert the attached 2D floor plan into a professional 3D exploded axonometric architectural diagram with exactly 4 vertically separated layers, rendered in strict architectural presentation style.
EXPLODED LAYER STRUCTURE (top to bottom):
LAYER 1 — FURNISHED INTERIOR (top): - Full furnished floor plan in 3D isometric view - Include all furniture per room at correct scale: · Living room: sofa, armchair, coffee table, TV unit · Dining area: table with chairs · Kitchen: countertops, sink, appliances, island if present · Master bedroom: king bed, nightstands, wardrobe · Secondary bedrooms: beds and wardrobes · Bathrooms: toilet, sink, shower or bathtub · Balcony: outdoor seating if applicable - Warm minimalist material palette: natural oak flooring, white walls, linen and cream upholstery - Small accessories allowed: 2-3 plants, books, throws - Room name labels with area in m² connected by thin horizontal leader lines extending to the RIGHT side only - No ceiling shown — open top view.
LAYER 2 — INTERIOR PARTITIONS: - Show only internal partition walls in 3D - No furniture, no flooring texture, no accessories - Walls rendered in warm light grey (not white, not dark) - All door openings must be visible as gaps in walls - Label: "INTERIOR PARTITIONS (Layout)" on right side - Same footprint and scale as Layer 1 exactly.
LAYER 3 — STRUCTURAL SHELL: - Show only the outer structural walls and load-bearing elements - Include window and door openings as voids - No interior partitions visible - Material: medium grey concrete or masonry texture - Label: "STRUCTURAL SHELL (Walls & Openings)" on right side - Same footprint and scale as Layers 1 and 2 exactly.
LAYER 4 — FOUNDATION (bottom): - Show base slab, column footings, and foundation grid - Structural columns must be clearly visible as separate elements - Material: dark grey concrete, raw and unfinished appearance - Label: "FOUNDATION (Base Structure)" on right side - Slightly wider footprint than upper layers to show foundation extending beyond wall line
SPACING & COMPOSITION:
- Vertical gap between each layer: equal spacing, approximately 1.5x the floor-to-floor height - All 4 layers must be perfectly aligned on the same vertical axis — no horizontal offset between layers - Thin vertical dashed lines connecting corners of each layer to show alignment (optional but preferred) - All layers rendered at identical scale and rotation - Axonometric angle: 30-degree isometric, consistent across all layers - Overall composition centered on white background - Labels on RIGHT side only, connected by thin horizontal lines, clean sans-serif font
RENDERING QUALITY:
Clean white seamless background — no shadows on background - Soft directional light from upper left for all layers - Each layer casts a very subtle drop shadow downward to separate it visually from the layer below - No lens effects, no depth of field blur, no vignette
Architectural presentation style — precise, technical, clean - Ultra high detail, photorealistic materials on Layer 1, technical grey materials on Layers 2, 3, and 4 - Final output: portrait orientation, all 4 layers visible in a single image without cropping
STRICT CONSTRAINTS:
Do NOT merge any two layers into one
Do NOT add a roof or ceiling to any layer
Do NOT change the floor plan layout from the reference image
Do NOT add rooms or walls that do not exist in the original
Do NOT use perspective projection — axonometric only
Do NOT add any decorative borders or graphic frames
All room labels must match the actual rooms in the plan
-----------------------------------------------------
RECOMMENDED TOOLS & HONEST WORKFLOW:
BEST OPTION — ChatGPT GPT-4o: The only AI tool that can read your attached floor plan image and attempt to preserve the actual layout in the output. Attach your 2D floor plan image directly with this prompt. Important: GPT-4o will struggle with the 4-layer exploded structure in a single generation. Use this approach:
Step 1: Ask GPT-4o to generate Layer 1 (furnished floor) first as a standalone image.
Step 2: Use that output as reference and ask for Layers 2, 3, 4 separately at the same scale.
Step 3: Combine in Photoshop or Canva manually, stacking layers with equal vertical spacing.
This staged approach produces significantly better results than asking for all 4 layers in one generation.
Prompt
Chicspaces
Design faster without designing less.
Navigate
Get in touch
Support available Mon–Fri, 9–6 ET
Remote-first — serving designers worldwide